Porosity Lens:


Tutorial:


My Tutorial has been written on creating lighting effects using proximity triggers to change an objects material glow parameter. To highlight my deeper understanding in this area I have included how to make multiple instantiated objects glow using 1 trigger, use multiple instantiated triggers to make 1 light glow and to make multiple triggers each with their own light glow. This meant that I had to break the video down into two shorter tutorials as it was quite long.
My original tutorial was recorded using CamStudio and I was able to break this down to produce the first video using Sony Vegas. However the second video needed editing and then I was confronted with massive rendering issues. The CamStudio clips were HD but when I put them in Sony Vegas they created glitches. Finally Rabi Deheini guided me to CamTasia and I was then able to quickly remake my 2nd tutorial using Camtasia Recorder and Studio and upload it to YouTube without any hitches.


This is what the same flowgraph looks like attached to the object you want to glow. With this one, once you have made it on your object you can select your object and copy it multiple times and they will all be attached to that trigger so you can use the one trigger to turn on several glow objects.
Welcome to my journey. This video has all been shot using the first person to reflect the spontaneous recording of movement that my environment allows. I have tried to artistically create a sense of movement having its own presence and identity and that a persons movement through a space, no matter how unobtrusive, leaves markers. I have attempted to display the spirituality of this movement through semi-transparent material depicting the movement as somewhat intangible.
 With Julian Cromarty's help I now have an on/off switch to spawn fire which makes it much easier to view my movement without the particle effect constantly triggering. I have also found a more appropriate particle effect as shown in the video.
 The glow beams trigger on when a player passes through them.
 The light beams trigger on when a player passes through a documented area.
 The coloured lights help to differentiate the separate trigger areas that the player passes through.
 The blue beams increase in glow intensity the longer a player remains within the trigger area. The lanterns, which have the railway framework pattern impregnated on their shades, increase in glow intensity each time the player enters the railway framework.
 A player has passed through this scene, depicted by short glow beams through the railway framework and the length of time spent within the longer blue beams.

 The intensity of time spent within a trigger spot is indicated by the density of the particle effect.
 The beams to the left are constructed of the long beams from the railway using a glass texture. The structure to the left is another component of the railway which has the standard texture opacity changed. Both these vertical structures have had collisions enabled therefore the player must negotiate around these obstacles.
 The main railway framework is interspersed with the railway sleepers which have had the opacity reduced and colour changed to blue, the sleepers also were imported without enabling collisions from sketchup so the player may run through them. This allows us to see how a player may negotiate his way through the railway framework (which has collisions enabled and therefore the player must negotiate their way around the framework). The longer beams are from the railway frame with a blue colour impregnated. They did not have collisions enabled however they test how the player is tricked into not running through them due to their lack of opacity unlike the railway sleepers which are more transparent and therefore encourage the player to run through them.
 Overview of the structures with the shadow patterns they create. Interestingly when playing the level I tend to want to spend more time within the shadowed areas.
 The lanterns are custom made. As they are to indicate how many times the player enters the railway framework by the increasing glow intensity, they have the same framework which was scaled down and coloured then intersected with the square box shade to reflect what they are recording.


This effect is interesting although I think that a time delay node needs to be input so that the glow effect does not trigger in front of the player. Alternatively the glow parameter can be set to change on leaving the trigger area which would be less complicated.


Time:Delay
The time delay node is the smallest of the nodes I shall be using. I have chosen this node as I intend to use lighting as a means of recording movement. CryEngine2 does not allow for more than 32 lights on at any one time Therefore the lights will need to be turned off when moving to different experimental areas. However, due to the need to record movement, it is useful to have lights turn on then delay their turning off in order to observe the movement which has just passed and also thereby observe the time taken to move through a path.
http://wiki.crymod.com/index.php/Sandbox_ObjectsEntityLights [accessed 26 Sept 2010].
This node is used to delay the transmission of any kind of information or signal.
The information or signal arriving at the “in” input is transmitted to the “out” output only when the “delay” input value (in seconds) is passed. The “delay input is usually manually decided by the user, however it can also be set dynamically. The node isn’t blocked when the first signal arrives, the arriving data is correctly operated continuously even during the delay pause.
Typical uses are the delay of data in order to correctly interact with other data in other nodes, or a simply pause between the triggering of something and the effects.
http://wiki.crymod.com/index.php/Flowgraph_Guide#Time:Delay [accessed 26 September 2010]
Entity:Proximity Trigger

The Entity:ProximityTrigger can be accessed by importing a proximity trigger into the game, Entity-Triggers-ProximityTrigger, then creating a flowgraph from its rollup bar, Flowgraph-Create-Rt Click-Add Selected Entity. The trigger node is a vital tool to record movement as it enables recognition of a player when it is close to a trigger point. This can then be used to trigger events to record the presence of a player, in my case I intend to use lights to record the players presence in an area.
Entity:AreaTrigger

I have added this node as I am not certain yet which trigger will be most appropriate to use. The Entity:AreaTrigger may also be used to record a player's presence in a given area and is accessed in a similar fashion using Entity-Triggers-TriggerArea. This is a similar trigger and I will attempt to utilise both inorder to ascertain which node is more appropriate in different situations.
AI:AIExecute

The AI:AIExecute node will enable me to manipulate an AI/third person to perform an action. This can be in the form of making the person move to a point/object, follow the player, follow a path and so forth as well as perform animations such as yawning, sitting down. I intend to use this tool to record the movement of third party people.
AI:AIGotoSpeedStance
 I have added this node as a fourth node as the AI:Execute node is interdependent upon this node for the movement of an AI in synchronisation with an object.

This is a shot of some chinese lanterns I put in the environment. They are hanging from the railway framework. At the moment they are not interactive, but I intend to work on them ...
 The environment with no lights on ... I have constructed a 'sculpture' using railway parts and changed the material to glass. The pieces are reaching up into the sky and appear like rays of light yet they cast striking shadows on the snow.
 The developing environment ...
 Some of the lights on ... they appear too bright, but they are better with a greater intensity when running around it ... perhaps some fine tuning required to create the right balance.
 Light effects on the sculpture ...

 The Animation - Squad Follows Player
 On start three people follow the player. They are given a follow area to follow within and two follow paths which they can switch between depending on which they are closer too. The followers have each been set to follow at different distances from the player, 8, 6 and -6. However, the follow area does not seem to work and they will actually follow the player outside the follow area. They do seem to show some preference to the two paths I set which run under the station framework.
I have added the stop follow command using the input key 'p', to demonstrate this I only switched off two of the followers and allowed the other to continue following.
 Move AI Towards Object And Perform Action
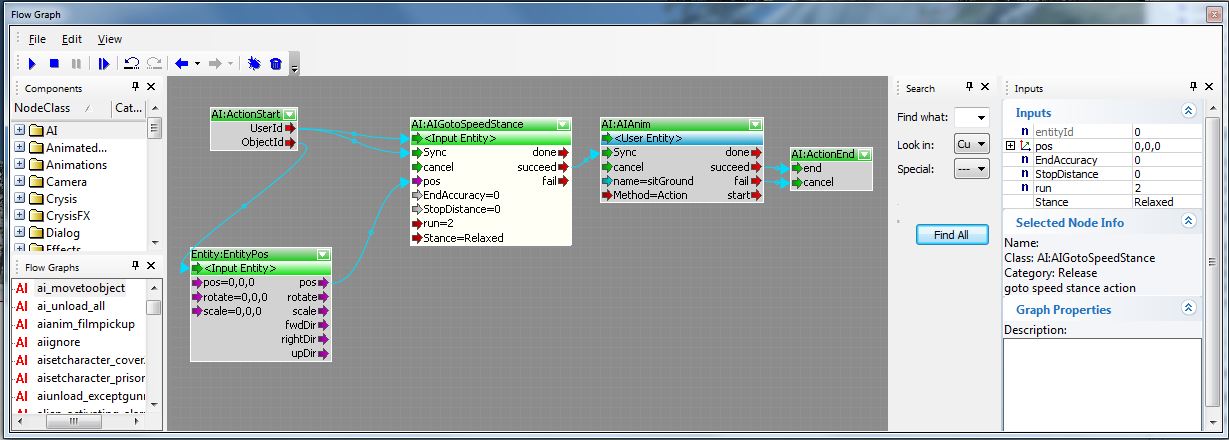 The Animation -
  Trees (static benchmark) and shadows (passing of time) ...
 Frozen Lake (central point) ...
 He has trouble running in the snow ....